Monday, November 4, 2013

In Case You Were Wondering...

Well in case you were wondering where I've been...... I've been busy slacking off. Well sort of. If you know me then you know I am sort of a jack of all trades type. I love to create in all different mediums. Lately I have not had the desire to create using anything I'm well acclimated to though. Sometimes this happens to me. I get tired of all the mediums I work in and I have to take a break from them and learn something new.

Lately I've been wanted to work with photo manipulation. I find the crazy crytozoology pictures both hilarious and intriguing. You know the ones I mean. The really weird ones you find on youtube when you've been looking at the site to long and you get to "that part of youtube". You know! We've all been there. It's doesn't matter what you go there to watch. If you click enough of the related links you WILL find your way there.
My first attempt. This was supposed to be a very large crow like the thunderbird legends.

ANYWAY....... I can't help but look at some of those pictures and think "I could do that......but better!". I know I sound cocky and maybe I am but I know what I'm capable of. Now here was my dilemma. I wanted to practice and make these crazy pictures but without actually trying to fool anyone. I really have no desire to further saturate the internet with hoax pictures or try to fool anyone. That is not something I want to do. So what do I do then. I don't want to just make pictures to sit on my hard drive. Where is the fun in that? I want to share my art. Even if I am just learning and I currently suck at it, lol.
This looks a little better bigger it was my second attempt. It's supposed to be a Chimera.

So while slacking off and surfing the web I happened across it. The solution to my dilemma. A site I could practice photo editing on, get valuable feedback, watch tutorials, enter contests, and share crazy made up edits with other people doing all the same things. All without trying to actually fool, con, or otherwise hoax anyone. Exactly everything and more of what I was wanting. So that is what I have been up too. As you can see by my edits thus far I still have some work before I perfect this art. Now that I can satisfy my artistic tooth of diversity you may see a few crazy works from me for the next couple of posts. Don't be alarmed. I will return to my other crafts and art mediums soon but I have to go with the flow. I have a very scattered way of thinking and working on things. It drives some people crazy but has always worked for me. Besides if I didn't have these moments where I needed to explore a new medium then I wouldn't be the eclectic artist I am. Know what I mean?
Again this looks better big. It's just supposed to be some kind of red bird of paradise or something.

Are you a scattered worker? Or are you all tidy and organized? Do you ever have random tangents where you decide you must learn a new skill?

Monday, October 7, 2013

Big News and a Lazy Slump

Ugg, I am in such a slump right now. I don't feel like doing anything. I could seriously sleep half the day. It took me forever to give up soda and I had gone over a year without drinking it. However I've gone back to soda as a means just to stay awake lately. I would love to go in the other room right now and start sewing but I just can't make myself get up and go do it.

Some of you may already be wondering by this point in my post about the big news. Well the news is that baby #5 is on the way. That is most likely the reason I am so tired and yet another reason I hate that I started drinking soda again. I've tried tea and candy and fruit and soda just seems to be the only thing that really works. I guess it could be worse though. On the bright side I usually don't even finish a can through the course of an entire day. It just feels like back tracking in my progress. It's better then falling asleep while trying to take care of the kids though. The funny thing is that I'm no longer used to drinking it so when I do drink soda my mouth feels dry. Blah!

Soooo, do any of you have any tips on how to just make yourself get back on the creative wagon? Or how to stay awake without soda? What do you do? Have you have "been there"?

Monday, September 30, 2013

Fox the Fox (PRP)

Hooray it's time for my project run and play reveal! I'm excited, are you? This week is about your signature look. Well there are several things you should know about me first. Both my husband and I have Native American ancestry and we are very earthy (yet clean) hippy-ish free spirit nature loving people. In case our children's names didn't give that away already.

Unfortunately my pictures this week kind of suck so I apologize for that in advance. I only had a few minutes for this shoot and it was cold, wet, and rainy out.


Our son's name is Fox and he totally lives up to it. He's quiet yet clever. I absolutely love his name and might secretly be a little jealous. There is a price he must pay for having such an awesome name though. The price is that mommy will dress him in everything fox related thing that she can get her hands on....... or make. It's ok I'm not so bad. I mean I could have made him an entire closet of fox costumes for every day of the week and never buy him normal clothes. Instead he will just be a fox every year for Halloween (until he asks to be something else), wear the occasional t-shirt with a fox silhouette, pants with fox embroidery, and a nice warm fox ear hat ever winter. So there might be a lot of orange in his life. To bad his favorite color is green just like daddy.

So anyway onto the outfit.

This outfit is entirely upcycled! The romper used to be a large men's shirt I thrifted, the jacket used to be a large men's sweater I thrifted, and the hat is the left over pieces from both. The ears on the hat even came from tiny scraps I had left over from two other upcycled projects. He loves the hat and the jacket and was a little disappointed he had to change into something else today. I would not have normally done a pointed fox hat but I came across some cute inspiration to do it that way. I'm not sure how I feel about it though. I might still go back and round out that point. I think it might be a bit to reminiscent of garden gnomes.

The romper is pretty basic but it does zip closed instead of snap. (I got that idea from a blog a couple years ago. I don't remember which one anymore so let me know if you know and I'll give credit and link over.) Also there is that adorable little tail. How can you not love a romper with a tail?


The jacket I drafted, cut, and finished all in one day. I'm so thrilled with that and how it came out. I can't wait to make some other great jackets with that pattern. It's a little long because I made it big so he could hopefully get some use out of it next year too. I paid a little more for that thrifted sweater then I normally would have (still only $5) because I fell in love with the color and the texture when I found it. It's made out of lambs wool and cashmere so as you can imagine it is crazy soft and will be nice and warm too. I don't want to waste any of it so I'm now on the look out for uses for all the little left over scraps, lol. I even had a 1"x 2" piece cut off from near a seam that I stitched two little pieces of scrap ribbon to and now the cats have a new toy. Isn't that ridiculous? How can I throw this stuff away though?

I scrimped the fabric together as much as I could to make the hat. Then I borrowed some from the shirt scraps for the trim on it and I already told you about the ears being left over scraps from another refashioning. Can you tell I hate wasting fabric? I feel like all fabric even the tiny insignificant ones should have a use. I've been known to use salvages and other tiny bits as stuffing for stuffed animals before. You just need to spread it out and use actual stuffing too or else it will be to heavy and will never dry if you have to wash it.

Oh did you notice those oversized elbow patches? Aren't they darling? This is my favorite shade of orange and I love how it looks with the dark grey. This maybe a new favorite color combo for me. So what do you think? Am I totally nuts? Or do little orange and grey clad foxes totally rock?

Monday, September 23, 2013

PRP Plaid Challenge

As you know I am playing along in the sew along for project run and play. So it shouldn't surprise you that this is another run and play post. This weeks challenge was plaid. I had a really pretty outfit planned out and then there ended up being much less of the fabric then what I realized. So that didn't pan out. However I was lucky enough that I had a large men's dress shirt I had begun to refashion into a dress for Nova. It was partly done and had been sitting in a box for a while because I thought I had messed it up beyond repair and it would never be worn. It had a number of issues but still for some reason I couldn't get rid of it.
 While searching my stash for more plaid I came across this lost cause of a dress. I also came across a beautiful pair of pants I bought second hand that also ended up having to many issues to be used. Two items that I loved but didn't think could be salvaged. Or maybe I knew somehow they could be but just didn't know how yet....

Then it hit me and I realized that the problems parts could be put together and repaired and a new and better dress could be made.


The shoulder straps on this dress actually came from the front of the pants that was supposed to lace up. I did a lot of unpicking and seam ripping to salvage the most amount of fabric as possible and everything worked together perfectly.

Nova LOVES her new dress. She has been asking me if she can wear it all week and I kept telling her it had to wait until I had time to take her pictures in it. So as you can imagine she is a very happy little girl today in her new dress.
A new dress to go with her new hair cut. Her first hair cut actually! Thankfully it doesn't really look much different. Fox's hair on the other hand........ well you'll just have to wait to see that.

In the mean time here is another picture of the whole dress. Notice the shirring around the waist? I wanted to keep the cuffs of the original shirt but obviously they would have been huge on her. So I cut them out the way I normally would but all the way down at the bottom of the sleeve and that gave me the cuff and saved me from needing to create a new one.


So what do you think? Does it look as sweet as I think it does? Have you ever saved a long forgotten and abandoned project? Do you hang onto your failures like I do in the hopes you will someday be able to salvage them?

Monday, September 16, 2013

Candy challenge (PRP)

It's another project and run and play post. This weeks challenge was to make something candy inspired. So I had to choose something chocolate of course. I mean who ever went trick-or-treating and didn't first dig through and eat all the chocolate candies first? I know I always did.

One of my favorite candies as a child and even now are Mounds and Almond Joys. For those who aren't familiar with them they are basically just chocolate and coconut and the Almond Joys have almonds on top. I'll do a post on how to make these homemade sometime soon. So much better that way in my opinion. Anyway I digress, back to the outfit.

I decided to go with Almond Joys and the candy itself instead of the outside wrapper. After all the candy is the good part and you just throw away the wrapper. So this left me with a great color scheme. Brown for the chocolate, tan for the almonds, and cream for the coconut. Luckily I had all three colors on hand. However I had them all in very very limited amounts. The tan I had the most of with probably around 2/3rds of a yard, the brown I had around 1/2 yd., and the cream I had at most a fat quarter. So I had to be creative and wise with my fabric. I should mention I did use some left over plain white for my lining.

I made this dress up as I went along. The only design element I knew I wanted to use from the beginning was the asymmetric collar. I was inspired by the last couple from this pin. However I knew mine had to be different since I was not using knit fabric. Hence mine is only in the front so it doesn't interfere with the zipper in the back. Ember loves that side panel of ruffles. That was actually born of necessity though. When I cut my tan fabric I did not have enough of it so I used it to my advantage and just filled in the gap. All of the ruffles are cut on the bias so I wouldn't have to hem them all. That would have taken forever and I wanted this to be a combination between finished and rough around the edges. Like country chic. Just like the candy with it's smooth fitted chocolate wrapped around the soft but shredded coconut and the hard crunch of the almonds.


Below the collar is a bib that is ruffled on either side with buttons down the middle.

I did a add a small nod to the wrapper of the candy with my zipper. It is mostly hidden except for that pop of blue color for the pull. Since the wrapper encloses the candy I thought the zipper was the cutest and most logical place to do an almost hidden tribute to it.


While making this Ember begged me to add pockets. I don't normally put them on dresses and she really loved it when I added them to the popover dress. I wasn't planning to add one here either but once I got done with the other design elements I decided it needed something more. I think the ruffle on that pocket might be my favorite part.


The panel of ruffles presented a problem for hemming. So I decided to just let it flow with the disheveled part of the look. I put in to lines of stay stitches a the bottom to keep fraying somewhat under control.

Overall I'm really satisfied with how this dress came out. I can't wait to see the designs the other ladies came up with. I'm sure there are going to be some jaw-droppingly beautiful outfits for this challenge. 

So what do you think? Did I pick a good candy inspiration? Did I do it justice? Does it make you think of my candy?

Monday, September 9, 2013

Pop Over Sundress Remix (PRP)

This is a project run and play post. Hence the "PRP" in the title. I've decided to sew along this time instead of just ooh and ahhh. The theme this week was to remix the popover sundress from Oliver & S.

Let me start by saying "wow!". This dress is really open to the possibilities. There are a lot of different directions you can take this in. It took me a while to figure out just what I wanted to do. I finally settled one a design I liked though.


As you can see I've been a little busy.


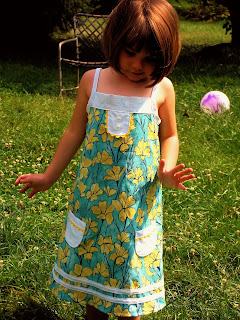
I added the bib with the rickrack and the buttons.


And I added two sweet little pockets to the front with a rickrack detailing. You can also see the double bands of bias tape I made for the bottom.

You would think I liked bias tape with all that I made for this dress but let me assure you I despise making it. I did at least find this lovely tutorial which at least made me feel a little better about making it since it reduced the amount of waste to nearly nothing. It's still a pain in the butt to do though. I think part of the problem is that I seriously need a better iron. The one I have eats the fabric as it goes along. BLAH!


As you can see the pockets have been approved.


I debated that double band of bias at the bottom. I'm glad I added it though because I like how it looks. Oh and I almost forgot. I decided I did not want to hassle with tying and retying straps on a busy almost 6 yr old. So I made them into normal straps no ties. Although I may hand sew some bows on eventually. I'm not sure it really needs it though.

So what do you think? Do you like the changes I made? Should I have done something differently? Please let me know. I'd love too hear your thoughts. :-)

Don't forget to check out the other amazing entries that other ladies have made for this dress too. Project run and play always has so much talent both in the actual contestants and in the sew along group.

Thursday, September 5, 2013

Painting an Old Mirror in the Frame

Ever since we painted our living room wall blue I knew I wanted to hang a large yellow mirror on it. However large yellow mirrors are not something you come across often and I didn't want to break the bank.

I was fortunate to not have to wait very long before finding a large mirror at a garage sale for pretty cheap. It wasn't yellow but that was easy to remedy. It had the original price tag still on it for $99.99. It had some scuffs in the paint (which I didn't mind since I'm painting it) so the people were only asking $8. SCORE!

This is how it started out.


The back was completely sealed and I didn't want to rip a beautiful paper backing off to paint the frame. So I improvised.

 I cut out pieces of cardboard the size I needed to cover the mirror. I left around an inch of mirror showing on each side though so I could take it to the mirror.


This is what my mirror looked like after I taped it. Just make sure that while doing this you tape only on the mirror and the cardboard and not onto the frame. You want to get the tape as close to the edge of your mirror as possible. It might even be a good idea to see if your mirror shifts at all in the frame. If it does then use this to your advantage and push it as far as you can away from you and then tape it down on the side closest you. Be sure to turn your mirror as you tape each side. You don't want to lean on your mirror to tape the opposite side and hear that awful crack sound.


Once you feel secure with your taping you can begin painting. I used spray paint. :-)


I let the first coat dry over night and then added another coating. You may need to re-tape some spots before you do. As you can see my tape was peeling up but I was able to just stick it right back down again.

Now if after your second coat your paint looks like it's starting to crack and bubble then don't panic. Mine did this for some reason and I thought I had seriously messed up somehow. I just left it to dry another night and when I came back in the morning it had all flattened back down and looked fine.


This is my finished mirror. I think it's even prettier in person. Although it does need a good wash (yikes look at those streaks!). You maybe able to see in this picture that a little bit of paint did seep through to the mirror. Despite my best efforts I kind of figured this may happen. I'm happy to report though that the paint that got on the glass scrapes of very easily. A little scrap with a razor blade would be the most you should need. Or you could do like I did and just use your nails. ;-) 


Wednesday, August 28, 2013

The Small Fry Skinny Jeans (Galaxy style)

I got the chance last week to participate in a sew-a-long and I jumped at it. I'm so thrilled I did. It took me a while to try sewing pants but thanks to Dana from made I got the extra push to do it. They were great and I learned a lot. I even drafted my own shorts pattern afterward. However it's been a while and I was ready to move onto the next step. Lucky for me Laura over at craftstorming.com came through. I learned so much from this project. I'm really glad I committed to participating because honestly if I would have seen the whole tutorial first then I may have thought it looked like to much work and passed on it. Breaking it down into days and knowing there were other people working on it at the same time was encouraging though. Plus this pattern was a piece of cake using Laura's clear pictures and easy to follow tutorial.


This was a lot of fun and if you've made pants but you've never done an adjustable waist or a faux fly before then you need to try it. This is the perfect project to learn with. I think I'll make a few more pairs and now that I know how to do those two things I will probably draft a couple more patterns soon.

I did have a couple problems along the way. However everything was due to my own error and easily remedied. The biggest change I made was that my pair are fully lined in bright orange. I should have taken pics of this however I was to anxious to try them on my little man. Why did I line them you ask? Well the fabric I chose ended up being much much thinner then I realized. However it ended up being a happy accident. Other then the obvious beautiful pop of color it adds to the inside and how lovely it matches the orange thread I top stitched with it also will make them a little warmer for the fall and winter months which are quickly approaching.


Oh and what does Fox think of them?


SUCCESS! Oh and they fit perfectly! My little man wears 2t to 3t but 3t are way long on him. I would say overall these fit him like a 3t everywhere but length. So if you have a tall thin child then I would try testing it in the smaller size your child normally wears and lengthening them. Then again they do have an adjustable waist so you could always go up a size and button them tighter. However they may not look as much like skinny jeans if you do that.

I've been hoarding that vintage galaxy print for something special but I never thought of using them on pants until I started raiding my stash for this project. I think they look like some sort of cool combination of "Star Wars" meets "Back To The Future". What do you think? Do you like how they came out? What do they make you think of? 

Friday, August 23, 2013

Homemade Pedialyte

Over this past week three out of our four babies have been sick. It's been a nasty little virus. Our kids normally don't get sick very often and when they do they are fortunate enough to not be sick for very long. This however was particularly mean.

My poor baby. She's still bright eyed and beautiful even when she's sick though.


Their pediatrician gave us a paper with a great recipe for homemade pedialyte though. According to her it is "the perfect combination of salt, water, and sugar to make your stomach turn over". That sounds like vomit but that is not what she was meaning. She meant that it helped readjust the lining of your stomach so you wouldn't lose liquids and become dehydrated.

So I bet you want the recipe, don't you? I thought so.

Recipe:

sugar - 8 teaspoons
salt - 1/2 teaspoon
filtered water - 5 cups

and it says you can use kool-aid to flavor it.

Also on the list was foods to avoid and foods they should eat.

AVOID LIST:

Juice, Soda, Gatoraid (These used to be good when sick but they aren't now that they are sweetened with corn syrup. Corn syrup is what they used to give babies to make them poop. It won't help with diarrhea.)

Fried anything, Red anything, Fast food, Most fruits and vegetables, Any other drinks with corn syrup.

SAFE FOODS: 

Start with Bananas, Cooked Carrots or Sweet Potatoes.

Then move onto Rice, Noodles (with no sauce), Plain bread or toast, Saltine or oyster crackers, Mashed potatoes.

When tummy is better able to handle food you can move onto Lean chicken meat, Scrambled eggs, Yogurt (as plain as possible WITH live cultures but no "junk food yogurts like go-gurt").


It's also important to note that you do not introduce a new food at this time. So if your child has never eaten something like sweet potatoes for example then that would not be a good option.

This worked for us but of course I am not a medical professional so don't take my word for it. When in doubt call your own doctor. These are just the guidelines that our great pediatrician gave us.

Of course I've got to share a well picture too. ;-)

Saturday, August 17, 2013

Taco Lasagna or Tacozagna

Lol, ok I don't think this is a new idea but I felt like I was inventing something new when I made it. I really winged it here on this but it came out great. Everyone loved it. I had my doubts while making it but even I liked it.

I started off by browning some hamburger in one of my big pots. I tossed a diced onion in there pretty early on too.

After that's all browned you want to add your taco seasoning. You could use a packet but I don't believe in those so I mixed my own spices.

Here is the combo and ratio I used for 1 lb of hamburger:

1 Tablespoon chili powder
1 teaspoon garlic powder
1 teaspoon onion powder
1 teaspoon oregano (or Italian herb blend)
1 teaspoon paprika
1 1/2 teaspoons cumin
1 teaspoon sea salt
1/2 to 1 teaspoon black pepper (depending on how much you like pepper)

Dump that in with your ground beef and you're well on your way. Next I added some red kidney beans and some great northern beans. These might seem odd for something taco in nature but trust me here. It works! If things are a bit dry at this point you can add a little oil. We always have olive oil so that is what I used. Besides we are blending Mexican and Italian here so it's ok, right?

It should look something like this at this point.


Now the fun part!

Spread some oil in the bottom of your pan. Now make a layer of tortillas over that. Next I added some of my funky concoction and spread it around. Then sprinkle some Mexican cheese on top. Add more tortillas and repeat until you run out of room. I added a layer of salsa to one of the layers too but I only had enough for one layer so all the other layers were just this mixture and then covered in cheese. Make sure when you get to the end you dump any juices left in the pot right over the top. Then give it a "healthy" coating of cheese. Then I topped it all off with some chopped up green onions.

Now bake in the oven uncovered for 15 - 20min at 400 degrees. This cuts and serves remarkably well. I was surprised. It also reheats well which I didn't expect. I thought for sure it would be soggy and yucky the next day but it wasn't. Hooray!!!


Friday, August 9, 2013

An utter failer

If you sew or do any craft for that matter than you probably know what it feels like when you have a stubborn project that just refuses to come together correctly. Aren't they frustrating? Don't they make you want to just scream? Or is that just me?

Well I just "finished" one of those projects. I don't normally name my dresses but this dress seems to beg for a name. All I can think of is "the failure dress". That doesn't seem very original though.

It might not look terrible in this picture but just wait.


Let me begin by telling you how this dress fought me in every step of it's creation.

I started out by drafting my own pattern. This normally goes quite well for me. I've got the process down pretty well so I don't think that is where I messed up here. I wanted to create an enclosed, lined bodice with sleeves and I think that is where the trouble started. I've never done this before and I winged it rather than researching it. First I started by adding a straight stitch to the sleeves so I could gather them and set them in. Then I realized I did this on the wrong side of the sleeve. My gathering stitch was on the hem instead of the shoulder. So I just went with it. I figured "that sucks but no big deal. Now they just look like flutter sleeves.". So onward I pressed. I sewed the neck pieces and the sleeves into the arms and left the two back parts open since I was planning to add a zipper. This would have worked fine except that when I went to flip it I realized I had one sleeve pattern up and one sleeve pattern down. I was annoyed and often at this point I would start a new project and stuff this in a bag or a box somewhere too patronize me the next time I stumbled across the failed garment. This time however for some reason I pressed through and unpicked the seam. This was no easy feat as the dress was the exact same color white as the dress and I think the exact same composition and the fabric is very soft.

Ugg, can you see where this is going?


Ok so, I get all of that unpicked and get it restitched. Then I stitch my skirt to my bodice. Let me tell you if you do it this way then stitch it to the INSIDE piece not the outside bodice first. I made that mistake. So then when I went back to stitch the back to it closed I was top stitching from the inside of the dress. BIG MISTAKE! I realized it was a problem as soon as I realized I would have to stitch from the inside. However I thought maybe I could just be careful and it would be ok. Somehow I managed to get all sorts of horrible bubbles and lumps and puckers and clumps sewn all out of wack. It was worse then I could ever have imagined. I would have had to unpick it regardless of if it was inside or outside but if it were inside then my picks wouldn't have shown up front and center on the dress. There was so over hang between the outside bodice and the lining because of the clumping so I trimmed this off. 

I was mad at this point and I'd already invested so much of my time with the whole sleeve thing that I wanted to just finish it. I couldn't leave it now!

So I picked and restitched. Somehow my stitches ended up short. I'm not sure if that is the right term or not but essentially all of the stitches pulled the fabric up together in spots. There was nothing I could do to fix this despite how I tried. So I just stitched over it and figured I could put a cute little bow over it in that spot and no one would ever know.

So onward I pressed......

The bottom ruffle was just annoying because this fabric frays like crazy! Trying to ruffle just shredded this stuff. So when I got done with my not so even ruffle I surged it. Still thinking that this dress might be wearable when I got done........


At this point all that was left to do was add the zipper. So I tried something new. I hate sewing the sides together and then sewing the zipper in and then picking all those stitches. I'd had my fill of picking on this dress already. So I thought maybe I could get away with stitching about an inch over where the zipper would be and then the rest of the way down where I would need an actual seam. This might have worked if executed better but I managed to flip my fabric around oddly and stitch it in like an invisible zipper on one side and made it look top stitched on the other. This wasn't to big a deal. I just top stitched the other side. The real problem here is that somehow the waist where the back bodice meets the skirt is nearly an inch higher on one side then it is on the other. I have no idea how this happened. Maybe where I trimmed the over hang due to the clumping issue? I dunno.

Blah!

Ok so if you made it this far then please share with me any insight you have or any project failure vents you might have of your own.

Wednesday, July 31, 2013

Bees

You know as a child I never really cared much for bees. I remember selling candy door to door for school and coming up to a big purple house with lavender bushes in front. Each bush loaded with small bumble bees flying about crazily and bumping into my legs as they buzzed by clumsily. It wracked my nerves and I was sure I was going to get stung. I couldn't get out of there fast enough. I was actually relieved no one came to the door so that I didn't need to stand there any extra time and I wouldn't have to come back to deliver candy to them after they ordered. I was not a fan of stinging insects and certainly not ones that could fly too. My fear came from ignorance though, like fear so often does.


Now as an adult I have come to love bees. Both honey bees and bumble bees. I was thrilled when we moved into our house and I discovered our back yard was filled with happy buzzing wild honey bees and bumble bees. I've run through our yard barefoot on many occasion and only once have I gotten stung. Mind you it was my fault for not watching where I was stepping. The kids have not been stung yet, despite the fact that they catch both honey and bumble bees on a daily basis. Yes, you read that right. My 5yr old started it and I was thoroughly amazed the first time she brought me a bee in the empty bubble bottle with a walnut covering the top to keep it from flying off. She is my little entomologist in the making so I was surprised she was able to capture it without getting stung but not so surprised by the idea of her trying. I was even more surprised when my 4 and 2 yr olds began catching them the same way without getting stung. How many 2yr old kids run around catching bees and don't get stung?

Now you might think the bees would get angry and want to retaliate after this. However these bees are so docile that the kids just remove the walnut while still holding the container and the bees just gracefully fly out, up, and away. It's pretty cool actually. I decided to give their technique a try. All the while I was half expecting that I would get stung doing it. Isn't that how it would work? Well I'm happy to say I did NOT get stung and it was actually surprisingly easy and not scary. When you're watching someone else it looks more risky than it actually is. I feel a lot better about them doing it now that I've tried it myself.

Even if they did get stung it wouldn't be the end of the world though. Everyone has to get stung at some point right? Just one more of life's experiences that we wouldn't be completely whole without. Besides bee stings are NOTHING compared to wasp stings. Did you know bee stings actually contain around 40 different healing properties? A lot of people use bee stings as an alternative treatment for a whole host of different common ailments. It's called apitherapy. You can read about it some here. So maybe we should start saying thanks when we get stung, lol. Okay maybe not but maybe at least not getting to bent out of shape about it anyway. Unless you're allergic that is. ;-)

Bees are so important that we haven't actually done a lesson plan on them yet. I want to make a really good one and maybe a week long thing on them. Although I don't know a week might be a little too much for my kid's attention spans at these ages. Keep an eye on my blog though and you'll see a lesson plan on bees soon. :-)

Monday, July 22, 2013

Birthday Mushroom Dresses

July is such a busy month for us. Half of our family of 6 has birthdays in this month alone within two weeks. So I feel a bit burnt out and frazzled to say the least.

I did manage to make our two birthday girls matching birthday dresses though. I'm pretty impressed with myself actually. I managed to get two dresses. One a size 4t and one a size 12-18m out of just one yard of my main fabric. I did use a different fabric to line the bodices and I decided to add a little ruffle of a different fabric to bring out the red and white polka-dot mushroom caps on some of the mushrooms. The main fabric is pink and covered in mushrooms. I don't like eating mushrooms very much but I love them decorating things. They make everything seem so magical and woodland-y. Okay so woodland-y isn't a real word but at least it makes more sense in the real word then braggadocious which was recently added to the dictionary. I'm glad I've never heard someone use that word before, lol. The sad thing is that isn't even the most absurd new addition. I can't even guess at the meaning of some of them so I'm going to play it safe and not post those on here. Who knows what I may accidentally say if I do.

Anyway without further ado here are lovely woodland-y dresses, and even more lovely birthday girls.

 Nom nom nom, sticks taste good!


 Of course I know you want to know what the back looks like too.

So these dresses are from my go to pattern that I use for everything. I have pictures taken to post a tutorial for it but it's going to take some time to put together. If you would like the tutorial just leave me some comments about it and I'm sure that will light the proverbial fire under my tushie too get it done a bit faster. ;-)